.png)
Step 2 — Comment
Each issue gets its own card, its own editor and its own status change — and the batch controls act on all of them at once.
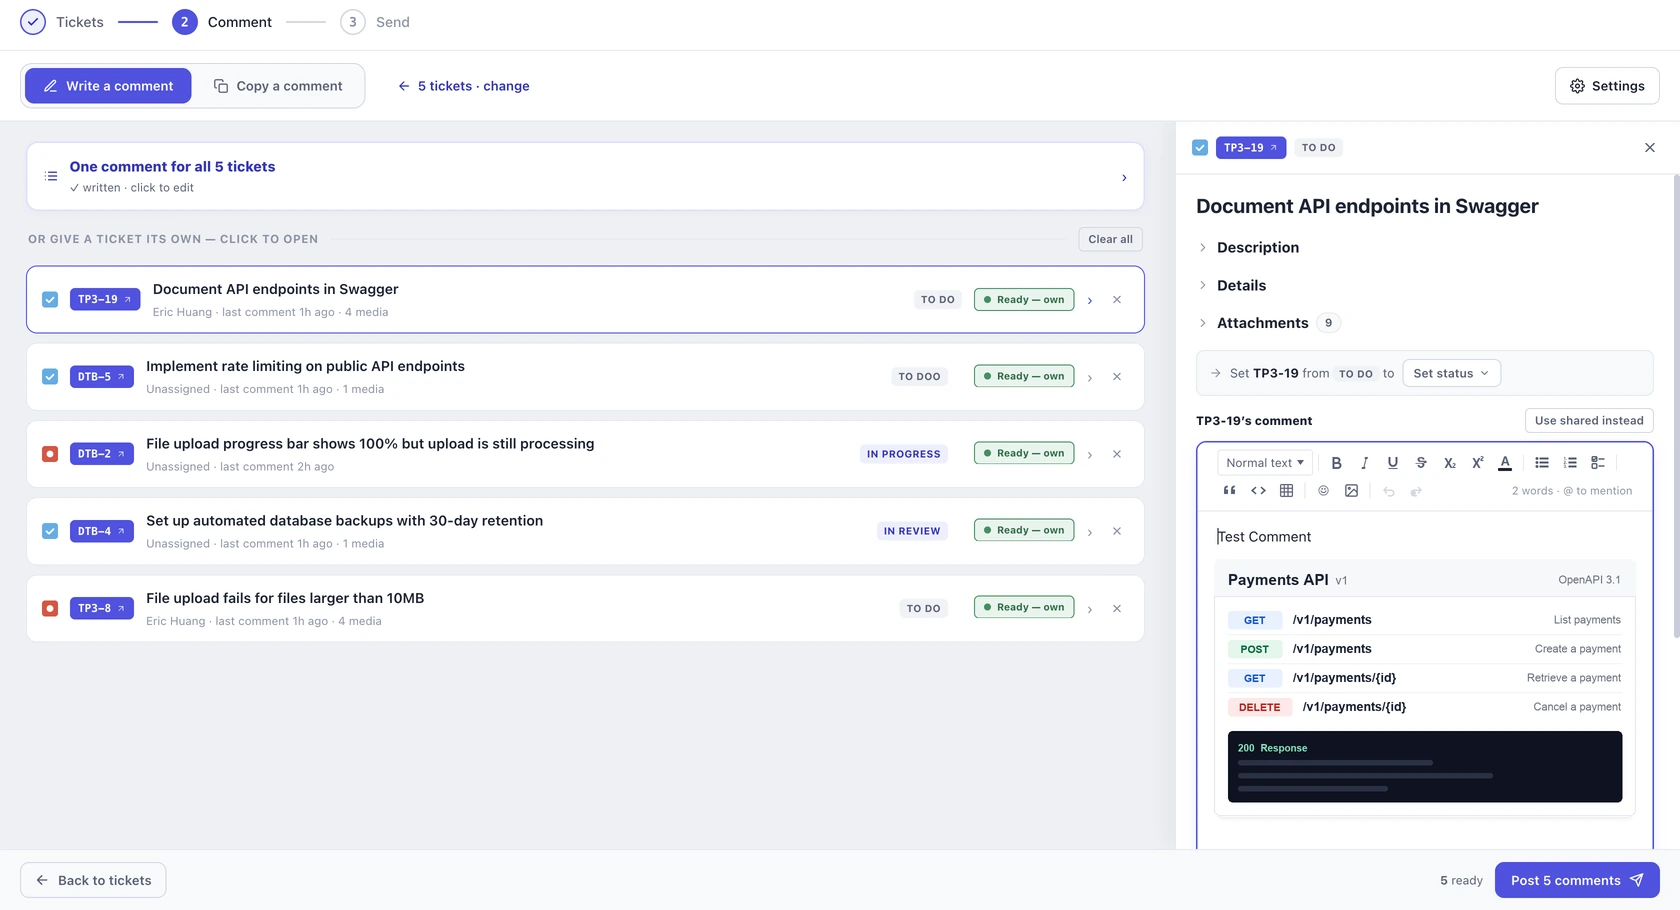
Write a separate comment on every issue you picked. Each one is its own composer with its own editor, attachments and status change, and you land on the list already able to type. The issues run down the left so you can jump between them, the composers sit in the middle, and a panel on the right shows the full detail of whichever composer you are on.
How the screen is laid out
Three regions, left to right. Everything on this step lives in one of them.
- Issue navigation — every issue in the batch, listed down the left. Click one to jump to it.
- The comment composer — one per issue, stacked in the middle. Each carries its own comment editor, its own attachments and its own status change, which is what makes twenty-five different comments possible in one pass.
- The details panel — on the right, and read-only. It shows the full detail of whichever composer you are writing in: description, fields, attachments and the issue’s own comment history.
Nothing is posted from this step. Everything you write is held until you send it on Step 3, and drafts survive if you leave and come back.
What is on a comment composer
One issue, one box. Each composer holds everything you can set for that issue — its comment, its attachments, its status change, and on a service project its audience. Reading the header from left to right:
- Issue key and Details › — one control. The key or the title opens the details panel; neither opens Jira. To reach the issue, use the key chip inside the panel — it carries an ↗. The Details › label drops away once the panel is open.
- Internal / Reply to customer — service projects only. These appear on Jira Service Management and Customer Service Management issues and nowhere else.
- ••• — that composer’s actions: copy its comment across the batch, copy its internal note across the batch, or clear it. Each entry names the real number it will affect. See Copy one comment across the batch.
- × — drops that issue. One click, no confirmation, because it does not throw away what you wrote: pick the issue again at Step 1 and its comment, note, status change and audience all come back. The same × is on every row of the list.
Beneath the header, at a glance, is the issue’s summary, who it is assigned to — or Unassigned — when it was last commented on, and a Ready badge once the composer has something to send. Enough to know what you are writing about without opening anything.
Status sits under the comment box, not in the header. On a request carrying two comments it sits below both, so it is always the last thing on the composer.
The details panel
You often need to read an issue before you can write about it. Press Details › beside the key, or the issue title, and the panel opens on the right showing that issue as Jira holds it. It is read-only, and separate from what you are typing.
It follows you. Scroll to the next issue, or jump to one from the left, and the panel is already describing it. One panel, always about the composer in front of you.
What it shows
You cannot change what appears here or what order it comes in — there is nothing to configure. What you can do is collapse any section you are not using, and that choice sticks as you scroll down the batch.
- Description — the issue’s description, rendered as Jira renders it.
- Details — the field grid, below.
- Attachments — only appears when the issue actually has attachments. Collapsing it is how you stop previews loading for every issue you scroll past.
- All comments — the issue’s comment history.
The field grid
Seven fields are always there, showing None when the issue has nothing in them:
Type · Assignee · Reporter · Parent · Priority · Due date · Labels
After those come every other field the issue has a value for — Sprint, Story points, Components, Team, Start date and any custom field your site adds — each under the name Jira itself shows for it, in alphabetical order. Created and Updated sit at the foot.
Empty fields are left out, so the grid stays as short as the issue is. A custom field added to your Jira next week appears here on its own; nothing needs setting up in the app. Fields Jira exposes without a readable name are skipped rather than shown as customfield_10042.
Above the grid, subtasks and linked work items are listed by relationship when the issue has them, and each opens in Jira.
The comment history
The list shows the 25 most recent comments, in full. The section header carries a count — 7 on an issue with seven, and 25+ once there are more than twenty-five. On a capped issue a note sits under the list — “Showing the 25 most recent. Open in Jira for the full history.” — so you always know whether you are looking at everything.
Images, video and files in that history play or preview right there: video plays inline with a thumbnail before you click, and images open in a full-size viewer you can arrow through. You never have to leave for Jira to find out what a past comment attached.
On a service project, each past comment says who saw it. A Customer badge in the accent colour, or Internal in yellow — so before writing a reply you can see what the customer has already been told, and what was only ever said to the team. Those badges appear only on service-project issues, because nowhere else does the distinction exist.
Opening in Jira, and resizing
The key chip in the panel header carries an ↗ and opens the issue in a new tab, leaving what you have written untouched. Subtasks, linked work items and individual comments open the same way.
Both side panels are resizable, and the width is remembered between sessions. On a narrow window they give way rather than squeezing you: the editor keeps a 560-pixel floor, and a pinned issue list drops back to its narrow strip if the panel would push the editor below that.
Attachments on the comment you are writing work the same way, right there in the composer, up to 150 MB per file — see The comment editor.
Internal/Reply to customer comment composer
Everywhere else in Jira a comment is just a comment. On Jira Service Management and Customer Service Management it also decides whether a customer is emailed, so three things change — and only on those requests:
- Every request carries an audience — Internal or Reply to customer, set in its header, per request.
- A request can carry both at once — a customer reply and an internal note, written separately and posted together.
- Two extra batch controls appear, for opening and removing internal notes across every request in one go.
Nothing on this page changes for an ordinary issue: it takes one comment, with no audience to choose. The full detail — including which comment posts first and why it matters — is on Service Management and Customer Management.
Change status while you comment
A status dropdown sits under each comment editor. Leave it alone and nothing happens to that issue’s status — it is optional, and set per issue.
Open it and you get that issue’s own workflow transitions, so only moves Jira would accept. Pick one and the button shows where the issue is heading; × clears it. Where a transition’s name differs from where it lands, the menu shows both — Respond to customer → Waiting for customer.
A status change can travel on its own. An issue with a new status and no comment still sends, rather than counting as blank and being skipped.
Sending and skipping issues
An issue with a comment written on it carries a Ready badge; an issue with only a status change queued and no comment reads Status only. An issue with neither carries no badge at all — nothing has happened to it yet, so there is nothing to announce.
An untouched issue is skipped when you send — nothing is posted to it and nothing happens to it. The footer counts everything, so “2 ready · 3 skipped” tells you exactly what is about to go out before you press anything.
Copy one comment across the batch
Some batches do want the same words everywhere — an incident resolved, a release shipped. Write it in one composer, then copy it across from that composer’s ••• menu.
- Copy this comment to n issues — fills every other composer in the batch.
- Clear this comment — empties that one editor. The issue stays in the batch and a queued status change is kept.
The number is real, and it excludes the composer you are copying from. If a target already has something in it the entry arms and asks again — Overwrite n comments? — before replacing anything, so a copy can never quietly wipe work you have already done.
It is a copy, not a link. Every composer stays independently editable afterwards, so the normal pattern is to paste the shared version everywhere and then change the two that need saying differently.
On a service project you get this twice — once for each audience. The menu carries a separate entry for the customer reply and for the internal note, so you can push one set of words to every reply in the batch and a different set to every note. A copy never crosses between them, so a reply can never land in somebody’s internal note — see Copying with two audiences.
Clear the whole batch
Clear all comments & status changes sits above the composers and wipes the work rather than the selection: every comment you have written and every status change you have queued. It asks first — the button changes to name exactly what it is about to take — so a stray press costs nothing. It only appears when there is something to clear.
Clearing does not send you back to Select — the issues stay picked, so it is the fast way to rewrite a batch. Nothing has been posted at this point, so there is nothing to undo.
On a service project there are two more buttons here, for opening and removing internal notes across the batch — see Internal notes across the batch.
Attachments work the same way here as anywhere else in the editor — see The comment editor for how files are attached, sized and uploaded.
The comment editor
Everything you write is posted as native Jira formatting, so a comment sent from here is indistinguishable from one typed into Jira itself — same headings, same tables, same code blocks, same file cards. The toolbar and the keyboard shortcuts deliberately mirror Jira's own editor, so there is nothing new to learn.
Shortcuts below are written in Mac notation. On Windows and Linux read ⌘ as Ctrl, ⇧ as Shift and ⌥ as Alt. The app detects your machine and shows the right one in every tooltip.
Headings
The dropdown at the far left of the toolbar sets the current block. It shows what you are currently in, so you can always tell whether the cursor is inside a heading.
Text formatting
codeLists, quotes and dividers
/dividerTables
The table button opens a size grid — drag across it to choose how many rows and columns you want. Once the cursor is inside a table, a second row of controls appears with everything you need to reshape it:
Code blocks
A code block keeps your indentation and monospacing intact, and carries a language selector with 42 languages — Bash, C, C++, C#, CSS, Dart, Go, GraphQL, Groovy, Haskell, HTML, Java, JavaScript, JSON, Kotlin, Python, Ruby, Rust, SQL, TypeScript, YAML and more, plus
(None)for plain text. The language travels with the comment, so Jira highlights it correctly on every issue you post to.Slash commands
Type
/anywhere in the editor to open a command palette, exactly like Jira's. Keep typing to filter the list, move with the arrow keys, and press Enter to insert. Twelve commands are available, so you never have to reach for the toolbar mid-sentence:/image· Image, video, or file/heading 1/heading 2/heading 3/bullet list/numbered list/task list/quote/divider/code block/table/emojiIt matches on synonyms. The attachment command is called “Image, video, or file”, but
/screenshot,/upload,/photo,/media,/attachand/videoall find it. The palette opens mid-sentence, not just at line start.Mentions, links and emoji
@; a bare@lists teammates. Only people are suggested — apps and service-project customers are filtered out. Mentioned people are notified on every issue the comment lands on, which is why a mention always asks you to confirm first./emoji.Attachments
Attach files three ways: drag them into the editor, paste a screenshot straight from the clipboard, or use the toolbar button. Dropping a file places it where your pointer is, not where the cursor happened to be.